Like almost every computer user today, I sometimes struggle to get all the updates to the software titles that I use on my computers, let alone find out about new software. There are many software repositories available online, but sadly, they are mostly for the Windows platform, and that is not too helpful for me, being an Apple user (my wife and I are both Apple users). But there is one that I have found to be helpful, well organized and current and that site is VersionTracker.
VersionTracker provides a list-type interface, as well as separate tabs for Windows, OS X, iPhone and the Palm OS.
If you use any of these software platform and didn't know about Version Tracker, head over right now. You'll be glad you did.
Showing posts with label Software. Show all posts
Showing posts with label Software. Show all posts
Monday, July 27, 2009

Thursday, March 26, 2009
Online Tools review: Google Reader
A few weeks ago, as I was browsing and reading through some favourite blogs, I came across an article on improving browsing time on the Web. This article, on Lifehacker, was essentially a bunch of tips on making better use of some of the available resources that can make your time online that much more productive. As I read through the article, one tip caught my eye: use an RSS reader. As I read this entry, one suggestion was using a tool like Google Reader.
Well, being an affirmed Gmail user, I decided to see what Google Reader (or GR) was all about. And let me tell you, I am still hooked! Google Reader is a web-based RSS aggregation application, also known as an RSS reader, and what it lacks currently in aesthetics, it makes up in functionality. GR allows a user to subscribe to RSS feeds and blogs, organize these subscriptions into groups, and display the feeds. As the tool is web-based, as mentioned previously, it becomes available from any computer that is connected to the Internet. Many have indicated to the future of computing being web-based, and although I have some reservations about this concept, GR and other such tools truly belong in this category.
As I learn more about GR, I will post further information as it becomes available. Do yourself a favour and check out Google Reader!
Well, being an affirmed Gmail user, I decided to see what Google Reader (or GR) was all about. And let me tell you, I am still hooked! Google Reader is a web-based RSS aggregation application, also known as an RSS reader, and what it lacks currently in aesthetics, it makes up in functionality. GR allows a user to subscribe to RSS feeds and blogs, organize these subscriptions into groups, and display the feeds. As the tool is web-based, as mentioned previously, it becomes available from any computer that is connected to the Internet. Many have indicated to the future of computing being web-based, and although I have some reservations about this concept, GR and other such tools truly belong in this category.
As I learn more about GR, I will post further information as it becomes available. Do yourself a favour and check out Google Reader!
Wednesday, January 2, 2008
Software review: iBank
I've decided that this year was the year I would get my finances back on track, and being a OSX user, I thought I would forego the usual PC choices and select an application that was designed from the ground up for this platform. This led me to iBank. Now, keep in mind, I'm not sure if this is the solution I would select if I was a multimillionaire, but I think that in my case, the scale of the application mirrors my needs perfectly.
I can tell this was designed by someone from my generation, when one of the built-in expense categories is Dining: Coffee! In my book, that truly deserves a category of it's own! Here's a look at the main interface:

It's been a pleasure setting up my budget, and the excellent Budget Monitor feature let's me see at a glance if I am sticking to my budget. With scheduled transactions, alarms and reminders indicate bills and due payments, so missed due dates are a thing of the past (knock on wood!):

I have been having some technical issues with the application though, with several crashes in the last couple of uses. Of course, I have not yet rebooted the system, and I would like to make sure that the OS is not the culprit here, rather than this program.
More to follow...
I can tell this was designed by someone from my generation, when one of the built-in expense categories is Dining: Coffee! In my book, that truly deserves a category of it's own! Here's a look at the main interface:

It's been a pleasure setting up my budget, and the excellent Budget Monitor feature let's me see at a glance if I am sticking to my budget. With scheduled transactions, alarms and reminders indicate bills and due payments, so missed due dates are a thing of the past (knock on wood!):

I have been having some technical issues with the application though, with several crashes in the last couple of uses. Of course, I have not yet rebooted the system, and I would like to make sure that the OS is not the culprit here, rather than this program.
More to follow...
Thursday, August 31, 2006
Unlocking the power of iTunes 2: Adding new visualizations
In our previous encounter, we learned about the various controls available from the keyboard in iTunes, specifically for controls related to visualizations... Well now, we need to learn how to add new visualizations to accompany the Visualizer provided by Apple.
This process is really broken down into two steps:
1. Locate and download a new visualization for iTunes
2. Move (or copy) the new visualization to the iTunes folder
There are several places to begin searching for new visualizations; an easy first choice is Google, followed by Apple's Downloads section. When one or more visualizations have been downloaded, it is time to move (or copy) them to the iTunes folder, in a specific place. The path to use is:
User folder / Library / iTunes / iTunes Plug-Ins
All new visualizations need to be placed within this folder. If iTunes was running, quit and relaunch the application, and the new visualizations should be available to select from the Visualizer menu, as can be seen in the image below:
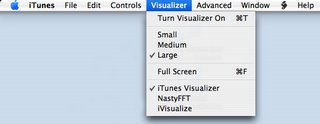
Have fun and see what else is available; I've been really enjoying one called NastyFFT, a great real-time, colour-switching spectrum analyzer...
Keep in mind that using the path provided above installs the new visualizations for the active user only, and not every user on the system. In order to have visualizations available to every user, move (or copy) the visualizations to the following folder:
Hard drive / Library / iTunes / iTunes Plug-Ins
In our next installment, we will explore some options available using playlists and smart playlists!
This process is really broken down into two steps:
1. Locate and download a new visualization for iTunes
2. Move (or copy) the new visualization to the iTunes folder
There are several places to begin searching for new visualizations; an easy first choice is Google, followed by Apple's Downloads section. When one or more visualizations have been downloaded, it is time to move (or copy) them to the iTunes folder, in a specific place. The path to use is:
All new visualizations need to be placed within this folder. If iTunes was running, quit and relaunch the application, and the new visualizations should be available to select from the Visualizer menu, as can be seen in the image below:
Have fun and see what else is available; I've been really enjoying one called NastyFFT, a great real-time, colour-switching spectrum analyzer...
Keep in mind that using the path provided above installs the new visualizations for the active user only, and not every user on the system. In order to have visualizations available to every user, move (or copy) the visualizations to the following folder:
In our next installment, we will explore some options available using playlists and smart playlists!
Wednesday, August 30, 2006
Unlocking the power of iTunes 1: Visualization control
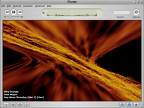 For those who have been using iTunes since it has come out, the following information might be old news, but for several new Apple users, this might be entirely new. iTunes is a fairly straightforward application to use, and most users, although proficient, are only aware of about 75% of what iTunes is capable of doing. This article will deal with the control of visualizations in iTunes. As you may already be aware, Apple has included a fairly complex, if somewhat psychadelic, set of visualizations for iTunes. These visualizations are built on a three concept: one layer, labelled the Visualization Form, a second layer, labelled the Visualization Effect and a third layer, labelled Visualization Colour. It is the combination of these three independant layers that creates the seemingly endless possibilities of Apple's visualizations.
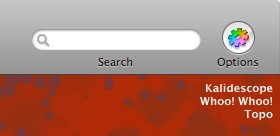
But now that we are aware of these layers, a question that comes to mind is how many are there and are they listed? Well, yes, and someone has gone through the trouble of listing the contents of these layers at Winston's iTunes Cheet Sheet. Apple has thoughtfully provided several keyboard controls for iTunes that are simply not published for consumers. Some of these keyboard controls are specifically for the advanced control of visualizations.
The three following controls, which allow the user to toggle each layer independantly, is used to create a specific combination of layers to reach a desired visual effect. These controls are:
- Q / W - toggle visualization "form"
- A / S - toggle visualization "effect"
- Z / X - toggle visualization "color"
Once a desired combination is reached, it can be frozen, or saved and assigned to a designated numerical key by using other commands. This can be an interesting addition for anyone using iTunes in a DJ setting, as it provides the ability to project a programmed visualization on cue. Here are these additional commands:
- D - Reset Visualization to default
- N - toggle Normal or high-contrast colors
- M - Manually select config mode (user, freeze, random)
- R- Randomly select config mode
- C - display Current visualization config
- NUM keys - user config presets (use SHIFT and # to record a preset)
Have fun experimenting with these settings. They can provide a new and interesting feature to a great media player like iTunes.
In the next installment, we will look at adding new visualizations to iTunes and where these can be procured...
Monday, August 28, 2006
Using scripts with iTunes...
It has come to my attention that several friends of mine have been using iTunes as their primary media player for a little while now, and although many of them are PC users, there are a few that are Apple users. And it is for these people that I write today; I would like to teach you to add functionalities to iTunes using some pre-built scripts. These scripts are Applescripts, and they can provide you with the ability to make iTunes work exactly the way you want.
This is a three step process, so here goes:
1. The first step is to locate the folder user/Library/iTunes and insert a new folder labelled Scripts.
2. Locate some existing scripts; a great site for this is Doug's Applescripts for iTunes site. So far, they have over 400 scripts available for free download.
3. Once you've downloaded a few scripts, unzip them and copy the scripts to the Scripts folder created earlier.
A new icon becomes available in the iTunes menu; this icon allows a user easy access to the new functions provided by the scripts.
Have fun...
This is a three step process, so here goes:
1. The first step is to locate the folder user/Library/iTunes and insert a new folder labelled Scripts.
2. Locate some existing scripts; a great site for this is Doug's Applescripts for iTunes site. So far, they have over 400 scripts available for free download.
3. Once you've downloaded a few scripts, unzip them and copy the scripts to the Scripts folder created earlier.
A new icon becomes available in the iTunes menu; this icon allows a user easy access to the new functions provided by the scripts.
Have fun...
Tuesday, May 23, 2006
Windows XP install on Mac Intel
As we may have all been reading lately, a winner has been declared in the running contest to get this done. The winner of the contest, known only as "narf," will pick up a cash prize of $13,854, accumulated through donations from contest supporters and other third-party sponsors. As reported in Ars Technica, here are some more details about this feat.
Here is what you'll need:
A Windows XP Pro (SP2) CD. Apparently, it does not have to be a bootable CD, but it does require the i386 directory at root level.
The xom.zip file.
Nero Burning ROM
A blank CD
A PC of course...
20-30 minutes
The instructions lay out the entire process in an abbreviated manner for those users who are more adept at performing "advanced" tasks like repartitioning drives and such, and in a more basic, step-by-step manner for users who might be slightly intimidated by the exercise. When you get down to it, you're creating a custom XP bootdisk, with some of the Microsoft files replaced with patched files created by narf. The files modified/added in the i386 folder are:
iaStor.sys
NTDETECT.COM
TXTSETUP.SIF
WINNT.SIF
XOM.INF
In addition there are several files being replaced and/or added in the $OEM$ directory:
$$/system32/drivers/xomdd.sys
$1/drivers/iastor/iaahci.cat
$1/drivers/iastor/iaahci.inf
$1/drivers/iastor/iaStor.cat
$1/drivers/iastor/iaStor.sys
$1/drivers/iastor/TXTSETUP.OEM
The final 5 items are replicated in the $OEM$/TEXTMODE directory. Once the custom Windows XP bootdisk has been developed, a repartition is required on the iMac's disk to contain both HFS+ and NTFS partitions, which for most people, means you're probably going to have to blow away your current install. Mac OS X will be installed to an HFS+ partition and you'll be installing an xom.efi bootloader which will then allow you to install Windows XP from your new disc.
At this point you're more or less dealing with a situation no different than your run-of-the-mill budget PC.
Here is what you'll need:
A Windows XP Pro (SP2) CD. Apparently, it does not have to be a bootable CD, but it does require the i386 directory at root level.
The xom.zip file.
Nero Burning ROM
A blank CD
A PC of course...
20-30 minutes
The instructions lay out the entire process in an abbreviated manner for those users who are more adept at performing "advanced" tasks like repartitioning drives and such, and in a more basic, step-by-step manner for users who might be slightly intimidated by the exercise. When you get down to it, you're creating a custom XP bootdisk, with some of the Microsoft files replaced with patched files created by narf. The files modified/added in the i386 folder are:
iaStor.sys
NTDETECT.COM
TXTSETUP.SIF
WINNT.SIF
XOM.INF
In addition there are several files being replaced and/or added in the $OEM$ directory:
$$/system32/drivers/xomdd.sys
$1/drivers/iastor/iaahci.cat
$1/drivers/iastor/iaahci.inf
$1/drivers/iastor/iaStor.cat
$1/drivers/iastor/iaStor.sys
$1/drivers/iastor/TXTSETUP.OEM
The final 5 items are replicated in the $OEM$/TEXTMODE directory. Once the custom Windows XP bootdisk has been developed, a repartition is required on the iMac's disk to contain both HFS+ and NTFS partitions, which for most people, means you're probably going to have to blow away your current install. Mac OS X will be installed to an HFS+ partition and you'll be installing an xom.efi bootloader which will then allow you to install Windows XP from your new disc.
At this point you're more or less dealing with a situation no different than your run-of-the-mill budget PC.
Subscribe to:
Posts (Atom)


 Posts

